Getting Started
Welcome to the VRChat API
The VRChat API can be used to programmatically retrieve or update information regarding your profile, friends, avatars, worlds and more. The API is designed around the REST ideology, providing semi-simple and usually predictable URIs to access and modify objects. This Getting Started quick-start guide is the fastest to get started using the API.
Where to Begin
These beginning steps will help you to set up the necessary environment, download the API specification, and start exploring the API. Start with creating a simple API request and then viewing the response. or more advanced guides, view all the tutorials available under Tutorials or click the “Next” button to the right.
Setup Environment
Download Insomnia
Insomnia is a popular and fast REST client that’s available for Windows, Linux and Mac. You can use Insomnia for exploring the API in a user-friendly interface. The program automatically handles authentication, cookie management and environment variables.
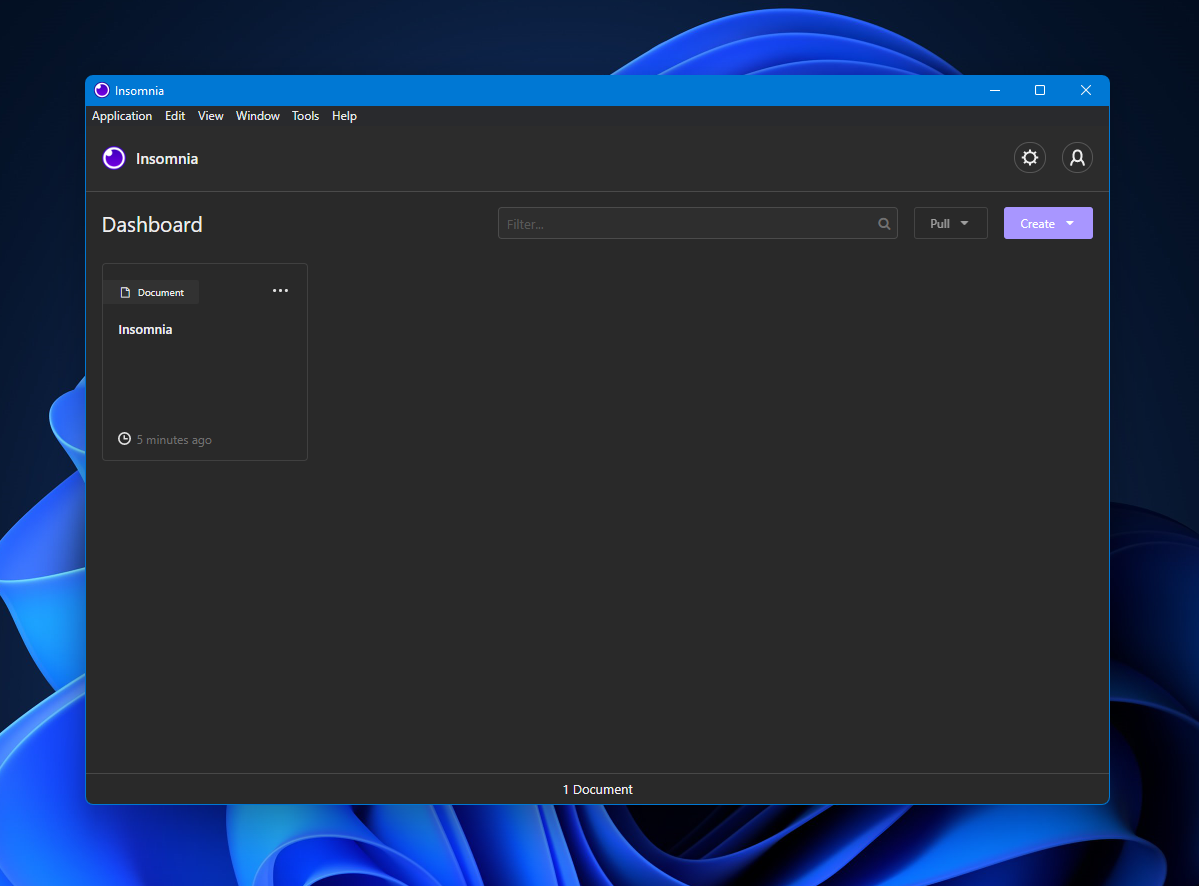
Simply click the downloaded EXE (or binary for your operating system) and Insomnia will install automatically. Once installed you should see a window similar to the one in the picture below. Theme can be changed in the top right corner by clicking the “Gear” icon. The remaining of this tutorial we be using the “Hyper” theme, but the steps remain the same.

Download the API Specification
Next, we are going to fetch the API specification for VRChatAPI. This is a community-written file in the “OpenAPI” format which defines all the public endpoints you can access and how to use them.

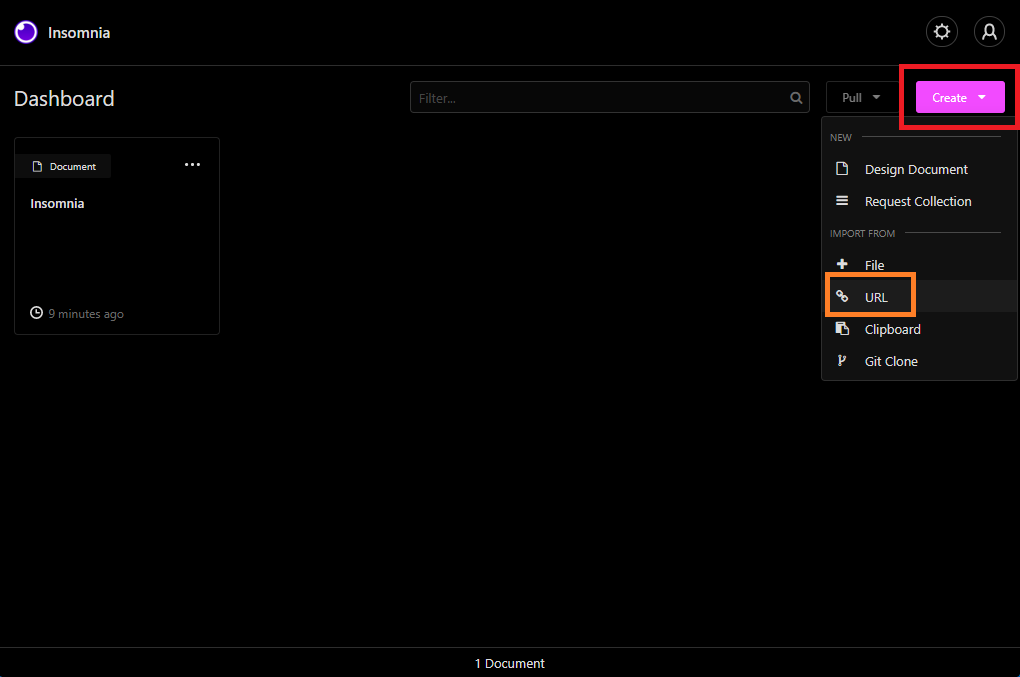
Click in the top right corner “Create > URL”, and in the following pop-up box enter the following URL and press “Fetch and Import”:
https://vrchatapi.github.io/specification/openapi.yaml
On the next window you will be asked if you want to import it as “Request Collection” or “Design Document”. As you will be using the API and not designing it, you want to press Request Collection here.

Now you’re ready to go! Now click on “VRChat API Documentation” to proceed.
Sending your First Request
Now we are going to send our first request!
You can skip it without negative consequences.
Go to Authenticate, as being logged in is required for most requests.
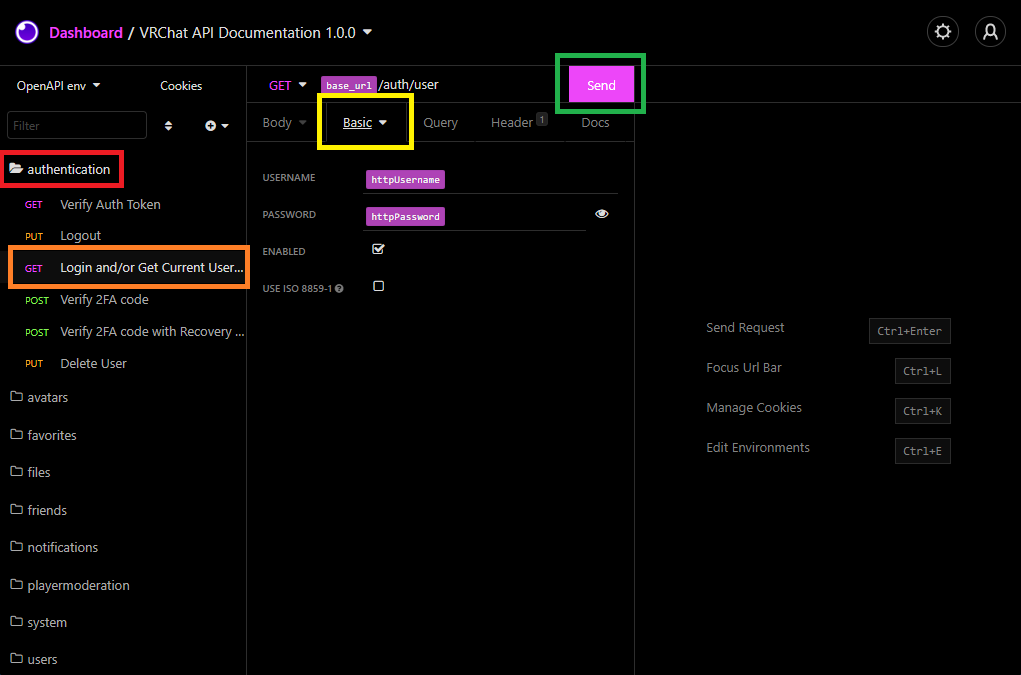
Click the “authentication” folder on the left, locate the endpoint “Login and/or Get Current User Info”.
In VRChat the same endpoint is used for authentication as getting your own user information.
If you are not logged in then it will generate an authtoken cookie for you and return your user info.
If you already are logged in then nothing will happen and it will only return your user info.
Click on the “Basic” tab, click behind the prefilled httpUsername and httpPassword and delete the variables.
Enter instead your own username and password and click “Send”.

If you do not have 2FA enabled (strongly recommend you do!) then you should see your own user information returned on the right side.
If you do have 2FA enabled (good job!) you need to locate the “Verify 2FA code” endpoint on the left, click on the “JSON” tab in the middle,
and then replace string with the real code from your 2FA generator app. If everything validated correctly you should see verified: true in the response.
You can now go back to the “Get Current User Info” endpoint and try get your own info again.
If you got an error, please stop and contact help on Discord, as spamming the 2FA can get your account temporarily locked!

That’s it! 🎉 Congratulations on getting started with the VRChat API!
But you are not done! In fact, your journey starts now! You can now begin to start exploring the API and play around with what is possible. Most of the endpoints are self-explanatory, and if you have any questions, you can always check in the API Documentation or contact on Discord. Please keep the number of requests you send per minute to a minimum. If you send requests too quickly you will get rate limited.
Please also keep in mind that any actions you take is your own responsibility, and that deleted resources such as worlds or avatars cannot be recovered. The writer of this tutorial accidentally deleted every single player moderation (mute, block, show avatar) they’ve made during the last 2 years. But that’s a story for another time.