Contributing to the API
Please read “Contributing to the Website” first. You will need a local instance of the website to preview what the docs will look like.
Structure
The documentation effort is primarily divided into two projects, the website and the specification.
The website project contains the source code building up the website, all the graphic resources such as images and CSS, and the Tutorials. This is where you want to contribute if you want to write or improve one of the tutorials. For more information, please see Contributing to the Website.
The specification is an OpenAPI document specifying the API in the tiniest detail. OpenAPI is both a human and machine-readable format and allows us to do a lot of cool post-processing stuff with it. The primary usage is generating the entire API documentation page, but it is also used to automatically generate the several language SDK’s we maintain. Once a new endpoint is documented it can be automatically updated on the website and in all the SDKs at once. This is where you want to contribute if you have found an error in the API docs or want to add a new endpoint.
Pre-requisites:
- Git/Github Desktop and knowledge of forking and making a PR.
1. Cloning the repository
Start with creating a fork of https://github.com/vrchatapi/specification and clone it with your favorite Git software.
2. Getting started with OpenAPI
To modify the spec it is strongly recommended to use Stoplight Studio.
- Windows: https://github.com/stoplightio/studio/releases/latest/download/stoplight-studio-win.exe
- Linux: https://github.com/stoplightio/studio/releases/latest/download/stoplight-studio-linux-x86_64.AppImage
- Web version: https://stoplight.io/welcome
While it is possible to modify the spec in a normal editor like VSCode, it is strongly recommended to use Stoplight, as it will additionally check for linting errors and speed up your workflow. Stoplight Studio still allows you to edit in text-mode if you prefer that.
The following optional video goes into better explanation of what OpenAPI is:
3. Open project
Open the specification folder you cloned earlier. It is very important to open the root folder, and not the openapi folder.
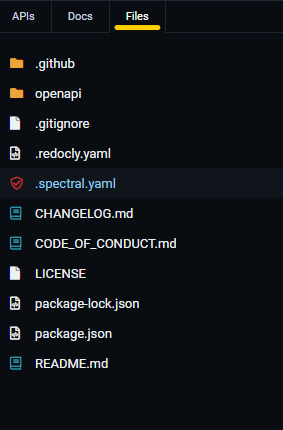
After opening the project, click on “Files” top-left. If there is a .spectral.yml file in the root folder then it is correct. Spectral is the linter for OpenAPI specifications, and is the configuration on what to warn about if done incorrectly in the spec. In the future look in the top corner if you have any active warnings.
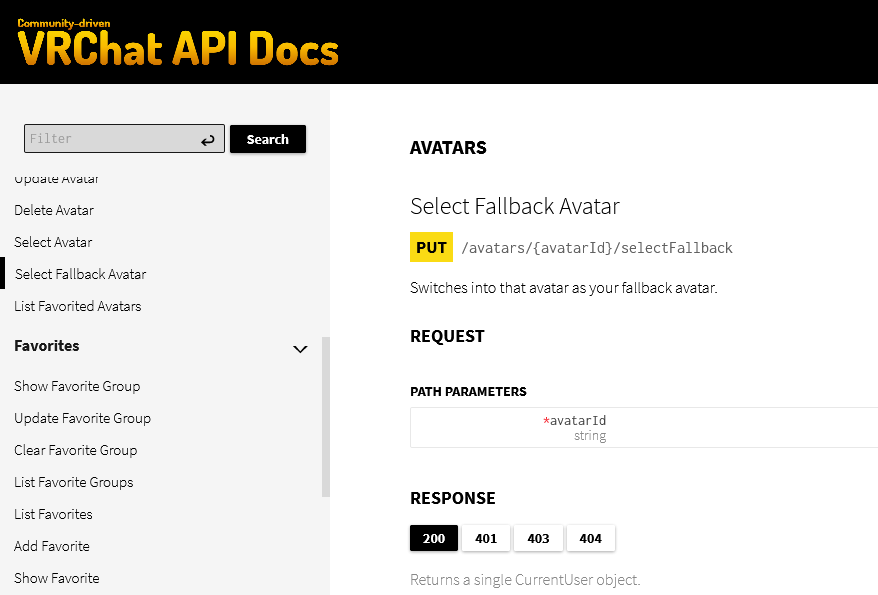
4. Example exercise: Add the “/selectFallback” avatar endpoint
In this tutorial we will be implementing the /selectFallback endpoint. Crucially the research has already been done for this endpoint, which saves a lot of time. If you want to follow along with exact steps, run the following command:
git checkout 1baabd944ba82f4180e7927789f8b10206bee8a9
This will checkout/restore the project at the specific point in time of where it is as of the writing of this tutorial. Please also study the research notes in the GitHub Issue thread closely to familiar yourself with what is needed to be done before proceeding.
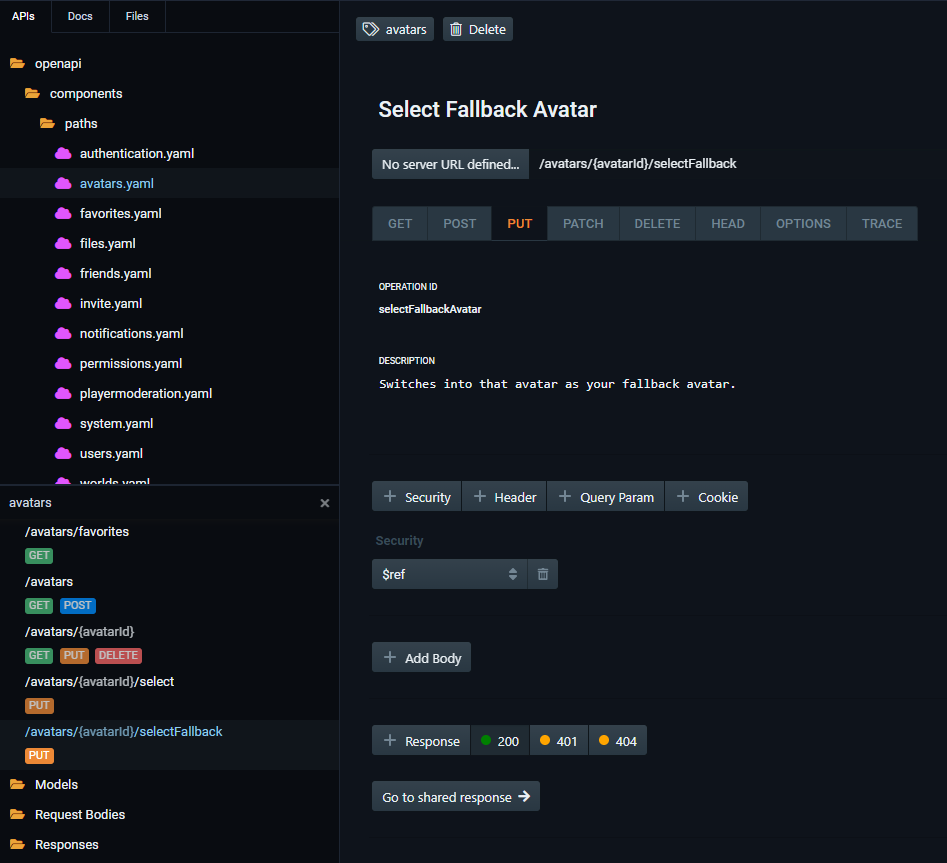
Go back to the “API” tab and click on the file openapi > components > paths > avatars.yaml. This will bring up the following window:
![]()
All of the contact info, license and global properties are empty. This is because “avatars” section is only a small part of the overall API. To make it more manageable, it has been split up into several smaller parts, and is afterwards combined with a bundler tool.
The research by waterflame concluded that the /selectFallback endpoint has the same inputs and outputs as the existing /select endpoint. We will therefore proceed with clicking the </> Code button top-right to switch into text mode, and then select the /avatars/{avatarsId}/select endpoint in the lower left corner. This will show most of the endpoint in blue:
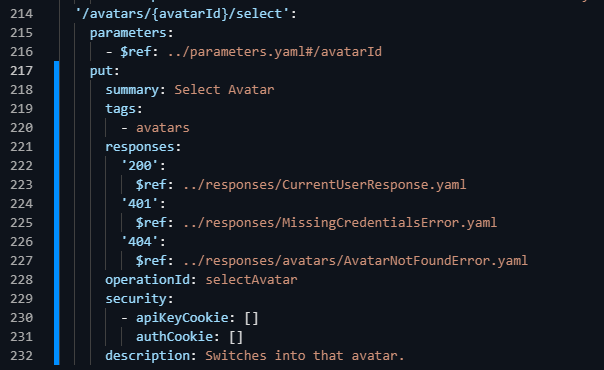
We then proceed with copying the entire endpoint, including the parameters and the URL header, and pasting it right below.
We also make sure to update the path to /selectFallback instead of /select, and update the summary (which will be the title), the operationId (which will be the function call in many SDK’s), and the description. Once you are done it should look something like:

We can click on the “= Form” button top-right to see what this looks visually.
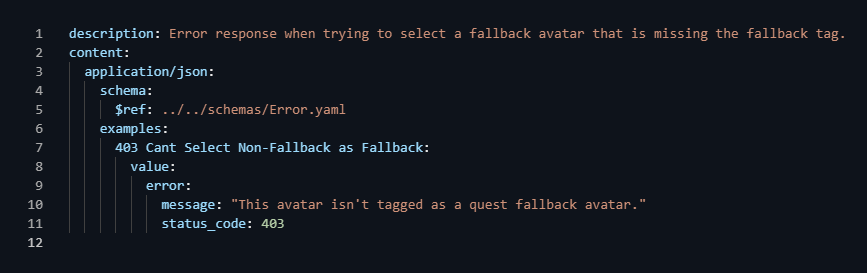
This looks good, we are almost done. As a minor addition, the research also found unlike /select, this endpoint has an additional possible error message, Code 403, This avatar isn't tagged as a quest fallback avatar.. To add this we click on “Files”, and open the folder openapi > components > responses > avatars and create a New File (because proper support for external Responses is not added yet) and name it AvatarNotTaggedAsFallbackError.yaml.
Easiest then is to copy the contents of the contents of the AvatarSeeOtherUserFavoritesError.yaml file and modify the message, title and description:
We then go back to the “API” section, select the avatars.yaml file, click "</> Code" and then select the /selectFallback endpoint bottom-left. We now add the additional error message we created, where the responses tab should look like the following. In case something is misspelled you will see an error in the top-right corner.
      responses:
        '200':
          $ref: ../responses/CurrentUserResponse.yaml
        '401':
          $ref: ../responses/MissingCredentialsError.yaml
        '403':
          $ref: ../responses/avatars/AvatarNotTaggedAsFallbackError.yaml
        '404':
          $ref: ../responses/avatars/AvatarNotFoundError.yaml
Finally, as mentioned before the specification is split up into multiple files. We therefore need to add our new URL to the main file, so it knows where to look for all the resources. We do this by editing the openapi > components > paths.yaml file.
Search for “select”, and add the new endpoint below the existing one. It should look like the following when done:
(Note: ~1 is used as slashes in the $ref reference pointer.)
'/avatars/{avatarId}/select':
  $ref: ./paths/avatars.yaml#/paths/~1avatars~1{avatarId}~1select
'/avatars/{avatarId}/selectFallback':
  $ref: ./paths/avatars.yaml#/paths/~1avatars~1{avatarId}~1selectFallback
That’s it! We are now ready to commit the changes and create a PR. If you are using the Web version, do it with the “Commit” button top left, or if you are on desktop with your favorite Git software.
5. Preview the API Documentation
The following is optional, but allows you to preview what the documentation will look like before you submit a PR.
Requirements: NodeJS. You don’t need to know any JavaScript programming, but you will need it installed. Download at nodejs.org.
Open the specification folder and run the following commands:
# Install dependencies (ignore if it throws vulnerability warnings, they are not applicable)
npm install

# Package the spec. This will bundle together all the files into a single specification, which can be used by the website.
npm run bundle

# Install a simple web server
npm install -g http-server

# Start it in the "dist/" folder
# The "--cors" part at the end allows the website on port 1313 to reach the spec on the different port 8080.
http-server dist/ --cors
Your version of the specification is now available at http://localhost:8080/openapi.yaml. Switch VSCode window to the website project and restart the hugo server with the following command:
# Windows cmd.exe
set HUGO_SPEC_URL=http://localhost:8080/openapi.yaml
./hugo.exe server

# Linux or Git Bash
HUGO_SPEC_URL=http://localhost:8080/openapi.yaml ./hugo server
(Note: The API Docs will not automatically reload if you re-bundle the API spec.)